
Home : 32mm : Panels :
Balanced Panels
The 32mm system default is balanced start holes, the first holes of the system rows are an equal distance from the top and bottom of the panels. Because the system doesn't care what happens above or below the top and bottom system holes / door and drawer faces, balanced start holes are not a requirement. The only purpose of unbalanced start holes is to increase/decrease the top/bottom cabinet reveals. The most common applications are increased countertop reveal and decreased (0mm/flush) bottom reveal.
In most applications the 32mm system does not care what happens behind the back system row. While some find balanced system rows more efficient, having system rows an equal distance (typ 37mm) from the front and back of the panels is not a requirement. If the machinery/methods are available, matching the rear system row to the rear drawer slide hole (multiple of 32mm) may be the most efficient route.
A fully balanced panel has balanced start holes and system rows. The following article was written a long time ago and touches on countertop considerations, fully balanced integral toe kick panels and more.
In the introduction we start to get an idea of how important panels are. Panels index most, if not all, other aspects of a cabinet. On this page I will be working with balanced panels. The system holes are the same distance from the front and back and the system rows start and finish the same distance from each end. This is not always practical and can have some drawbacks as will be apparent in other pages.
In the small shop with simple boring methods it is much easier to set up once to drill all holes and this usually outweighs the drawbacks of unbalanced panels. There is also the point that you don't have to worry about or keep track of top and bottom, and front and back.
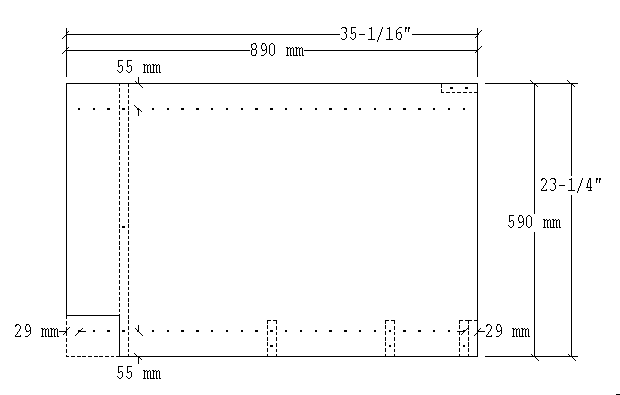
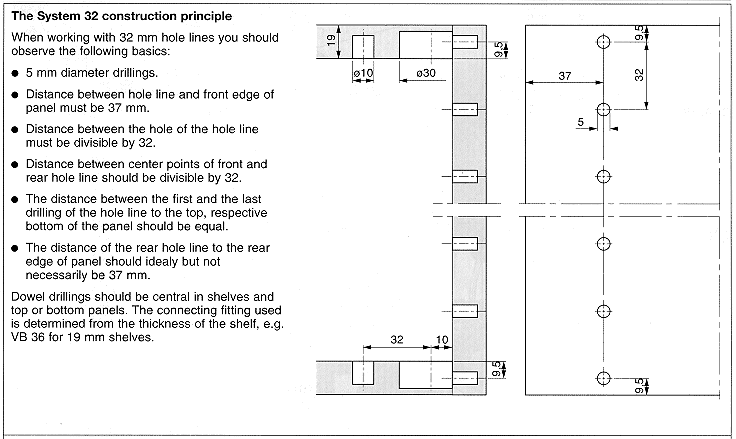
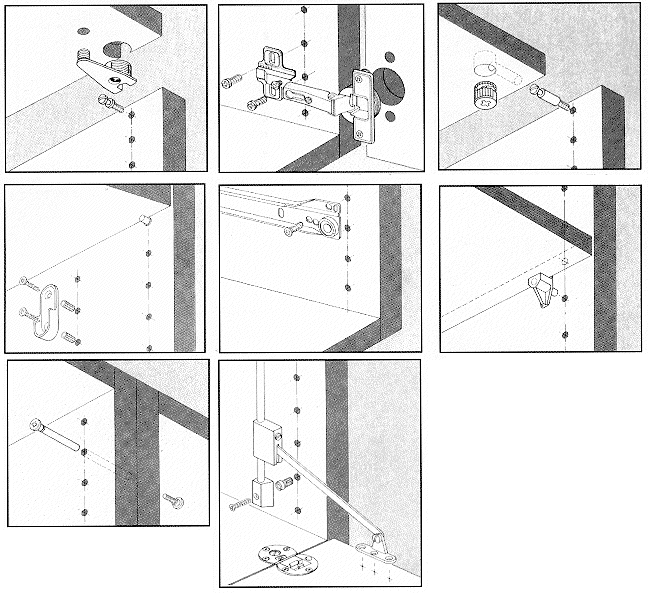
For an example of a balanced panel see kbipanel.gif (railed inset, intregal toe). You can also look at princ1.gif to see how one company (Hettich's System 32) uses a balanced panel and the top left connector in example.gif.
Connectors will be covered in depth later but I want to mention that it is possible to use the same setup you use to bore your 5mm line holes to bore for the top left connector seen in example.gif above. As a balanced panel is easier to linebore it is also easier to bore for connectors.
In the introduction we covered front and back setbacks. The front to back dimension of our panel is some multiple of 32mm + 37mm front and back. Next we need to decide where our system rows start and finish. This is determined by what we use for the top of our cabinet.
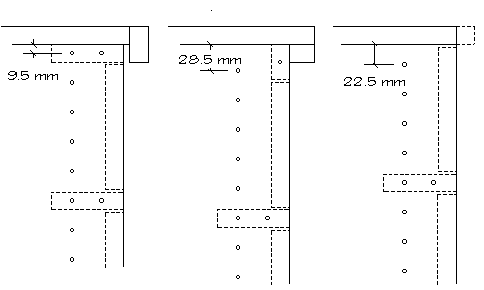
A typical European box is just that a box with feet attached to the bottom. Using system holes to assemble the box requires that the top and bottom hole on the panel need to fall in the middle (thickness) of the cross member. Using 3/4 (19mm) material this means the top and bottom hole in the panel needs to be 9.5mm (3/8) from the top and bottom edge of the panel. This works for closets, some styles of freestanding cabinets and kitchen cabinet uppers. My kitchen base cabinets and freestanding cabinets sometimes take a different form and require a different location for the top (and bottom to balance the panel) hole. Two factors are involved, cabinet style and how we deal with the top/countertop.
European kitchens generally use a 1"+ countertop that sits on top of the cabinet box while the US generally uses a 3/4" top with a build down on the front edge to make the counter appear 1 1/2" thick. Since this causes a problem with drawers and doors we, in the US, may need to build up the traditional European box by adding 3/4" strips to the top of the box (see cntrtop.gif).
The European way works with any style of cabinet. In the US we can make adjustments to avoid having to nail on 3/4" strips. How we do this is affected by style, the thickness of our top/countertop and if our top/countertop sits on top or is built down. For some examples of tops/countertops for the inset style of cabinets see cntr_eg.gif
While I would like to standardize my top and bottom hole at 9.5mm, this is not possible. What I can do is decide that, like our front numbers (37mm + door thickness if inset) the top/bottom numbers will be the same relative to style and how we treat the top/countertop. I now have what is called a balanced panel. As always there are exceptions, but they are rare. I should note that this doesn't mean that the tops and bottoms of boxes need to be in the same position relative to the panel top/bottom (e.g. integral toe kicks).
We now have limited our possible panel sizes to a finite number. What we need to do is decide how we are going to make our tops/countertops for each style of cabinet we make. If we are making freestanding and kitchen cabinets we need to settle on one or two kinds of panels. It is possible that we can use the same top/bottom hole setback for both freestanding and kitchen cabinets. It is also possible that we can use the same top/bottom hole setback for two and even all three styles of cabinets. I will be covering some of the possibilities on another page. We now have from one to six panel designs. The size of these panels is two times the distance to our first holes (f/b and t/b) plus any increment of 32mm. We can create a chart or database of these possibilities.
We still have a whole lot of options. To arrive at a more limited number we need to consider the kinds of cabinets we make. Most cabinets have standard sizes, e.g. kitchen base cabinets are 36" high (including the countertop) and 24" deep. If there are not industry standards we need to come up with our own. We need to sit down and list all the sizes of panels we make. It may be that we can have some panel sizes that will serve multiple applications. The goal is to come up with a limited number of panels requiring as few setups as possible. Balanced panels will not work in all applications and sometimes I go through hoops to make them work. Future pages will cover some of the possibilities of balanced panels including kitchens.
One other consideration in arriving at some stock panel sizes will be what we use to bore our holes. We may use a jig (and drill one hole at a time) or have a machine that drills a number of holes at the same time. For every method/tool there is a perfect panel, a panel that is easier to make because of what we use to bore holes.There will be situations where one of our panel sizes could be adjusted to make it a perfect panel, or at least make it easier based on what we use to bore our holes. The odds are it will seldom match a standard size and sometimes manual boring a few holes is a better solution. There are many other considerations that effect panel size. Examples include drawer sizes, how drawer slides match system holes, having a fixed center shelf, balanced doors, hardware, and cross members. These and others will be discussed on future pages.
We have been working mostly on panels and how they can be sized (height and depth) in increments of 32mm. We have worked on the idea of coming up with a limited number of "stock" panels. What we haven't looked at is the width of our cabinets. The same dimensions that apply to cabinet height can be applied to cabinet width, e.g. full overlay boxes that are a multiple of 32mm high and wide or half overlay cabinets that are a multiple of 32mm plus panel thickness tall and wide. When using the 32mm system, using 32mm increment widths is by far the most efficient way to go.

In the small shop with simple boring methods it is much easier to set up once to drill all holes and this usually outweighs the drawbacks of unbalanced panels. There is also the point that you don't have to worry about or keep track of top and bottom, and front and back.
For an example of a balanced panel see kbipanel.gif (railed inset, intregal toe). You can also look at princ1.gif to see how one company (Hettich's System 32) uses a balanced panel and the top left connector in example.gif.
Connectors will be covered in depth later but I want to mention that it is possible to use the same setup you use to bore your 5mm line holes to bore for the top left connector seen in example.gif above. As a balanced panel is easier to linebore it is also easier to bore for connectors.
In the introduction we covered front and back setbacks. The front to back dimension of our panel is some multiple of 32mm + 37mm front and back. Next we need to decide where our system rows start and finish. This is determined by what we use for the top of our cabinet.
A typical European box is just that a box with feet attached to the bottom. Using system holes to assemble the box requires that the top and bottom hole on the panel need to fall in the middle (thickness) of the cross member. Using 3/4 (19mm) material this means the top and bottom hole in the panel needs to be 9.5mm (3/8) from the top and bottom edge of the panel. This works for closets, some styles of freestanding cabinets and kitchen cabinet uppers. My kitchen base cabinets and freestanding cabinets sometimes take a different form and require a different location for the top (and bottom to balance the panel) hole. Two factors are involved, cabinet style and how we deal with the top/countertop.
European kitchens generally use a 1"+ countertop that sits on top of the cabinet box while the US generally uses a 3/4" top with a build down on the front edge to make the counter appear 1 1/2" thick. Since this causes a problem with drawers and doors we, in the US, may need to build up the traditional European box by adding 3/4" strips to the top of the box (see cntrtop.gif).
The European way works with any style of cabinet. In the US we can make adjustments to avoid having to nail on 3/4" strips. How we do this is affected by style, the thickness of our top/countertop and if our top/countertop sits on top or is built down. For some examples of tops/countertops for the inset style of cabinets see cntr_eg.gif
While I would like to standardize my top and bottom hole at 9.5mm, this is not possible. What I can do is decide that, like our front numbers (37mm + door thickness if inset) the top/bottom numbers will be the same relative to style and how we treat the top/countertop. I now have what is called a balanced panel. As always there are exceptions, but they are rare. I should note that this doesn't mean that the tops and bottoms of boxes need to be in the same position relative to the panel top/bottom (e.g. integral toe kicks).
We now have limited our possible panel sizes to a finite number. What we need to do is decide how we are going to make our tops/countertops for each style of cabinet we make. If we are making freestanding and kitchen cabinets we need to settle on one or two kinds of panels. It is possible that we can use the same top/bottom hole setback for both freestanding and kitchen cabinets. It is also possible that we can use the same top/bottom hole setback for two and even all three styles of cabinets. I will be covering some of the possibilities on another page. We now have from one to six panel designs. The size of these panels is two times the distance to our first holes (f/b and t/b) plus any increment of 32mm. We can create a chart or database of these possibilities.
We still have a whole lot of options. To arrive at a more limited number we need to consider the kinds of cabinets we make. Most cabinets have standard sizes, e.g. kitchen base cabinets are 36" high (including the countertop) and 24" deep. If there are not industry standards we need to come up with our own. We need to sit down and list all the sizes of panels we make. It may be that we can have some panel sizes that will serve multiple applications. The goal is to come up with a limited number of panels requiring as few setups as possible. Balanced panels will not work in all applications and sometimes I go through hoops to make them work. Future pages will cover some of the possibilities of balanced panels including kitchens.
One other consideration in arriving at some stock panel sizes will be what we use to bore our holes. We may use a jig (and drill one hole at a time) or have a machine that drills a number of holes at the same time. For every method/tool there is a perfect panel, a panel that is easier to make because of what we use to bore holes.There will be situations where one of our panel sizes could be adjusted to make it a perfect panel, or at least make it easier based on what we use to bore our holes. The odds are it will seldom match a standard size and sometimes manual boring a few holes is a better solution. There are many other considerations that effect panel size. Examples include drawer sizes, how drawer slides match system holes, having a fixed center shelf, balanced doors, hardware, and cross members. These and others will be discussed on future pages.
We have been working mostly on panels and how they can be sized (height and depth) in increments of 32mm. We have worked on the idea of coming up with a limited number of "stock" panels. What we haven't looked at is the width of our cabinets. The same dimensions that apply to cabinet height can be applied to cabinet width, e.g. full overlay boxes that are a multiple of 32mm high and wide or half overlay cabinets that are a multiple of 32mm plus panel thickness tall and wide. When using the 32mm system, using 32mm increment widths is by far the most efficient way to go.